
Managing Editor
@ShahidNShah
@ShahidNShah
Who this is for: Care-management leads, RT supervisors, pharmacy/IT, and Hospital-at-Home or RPM teams supporting patients who travel for work, family, or seasonal migration.
Why it matters: Trips disrupt routines. Missed doses, incompatible power, packing errors, and unclear airline rules can trigger flares, urgent-care visits, and messy adherence data. A lightweight, standardized protocol keeps therapy on track with clear prep, compliant packing, and simple digital touchpoints.
Travel changes routines, but a patient’s therapy shouldn’t. For care-management leads, RT supervisors, pharmacy/IT, and Hospital-at-Home or RPM teams, travel season reliably exposes weak points: missed doses, incompatible power, confused packing, and unclear airline rules. The result is predictable – symptom flares, urgent-care visits, and messy adherence data. A travel-ready protocol turns that chaos into a checklist.
Starting 7–14 days before departure, teams confirm prescriptions and device compatibility, convert to unit-dose, preservative-free vials when appropriate, and issue a one-page Travel Action Plan with contacts, red flags, and refill steps.
Patients learn what to pack, how to clear security with medically necessary liquids, and how to clean and store gear on the go. Time-zone-aware reminders and one-tap logs keep dosing on schedule and documentation intact. Build it once, reuse it for every trip – and keep therapy, comfort, and data continuity intact from gate to hotel.
1) Pre-Travel Workflow
T-14 to T-7 days: Begin with a regimen check and refill status. Where appropriate for travel, convert to unit-dose, preservative-free vials and verify the patient’s packing quantities match the itinerary. Refresh teach-back on setup, dosing, mask fit, cleaning, drying, and how to log sessions on the app. Generate a one-page Travel Action Plan covering what to pack, when to escalate, how to request refills away from home, and exactly how to reach the care team after hours.
T-3 days: Confirm voltage, plug type, and battery watt-hours (label batteries if possible). Ask the patient to check their airline’s policy for in-flight nebulizer use. Turn on itinerary-aware reminders in the app so dose times adjust automatically across time zones.
Day of travel: Meds and devices go in the carry-on. Medically necessary liquids ride in a separate pouch for declaration. Expect visual inspection at security; advise the patient to allow extra time.
2) Clinic Timeline Table
| Timeframe | Core Actions | Primary Owner(s) |
| T-14 to T-7 days | Regimen & refill check; convert to unit-dose; teach-back; issue Travel Action Plan and packing list | RT + Pharmacy + Care Manager |
| T-3 days | Verify voltage/adapters; confirm battery Wh and airline approval if >100 Wh; enable time-zone reminders | RT/IT (RPM) + Patient |
| Travel day | Carry-on packing; liquids separated for declaration; allow time for inspection | Patient (coached by Care Manager) |
| Post-trip
(within 72h) |
Import logs; reconcile missed sessions; adjust plan if needed | RT/IT + Clinician |
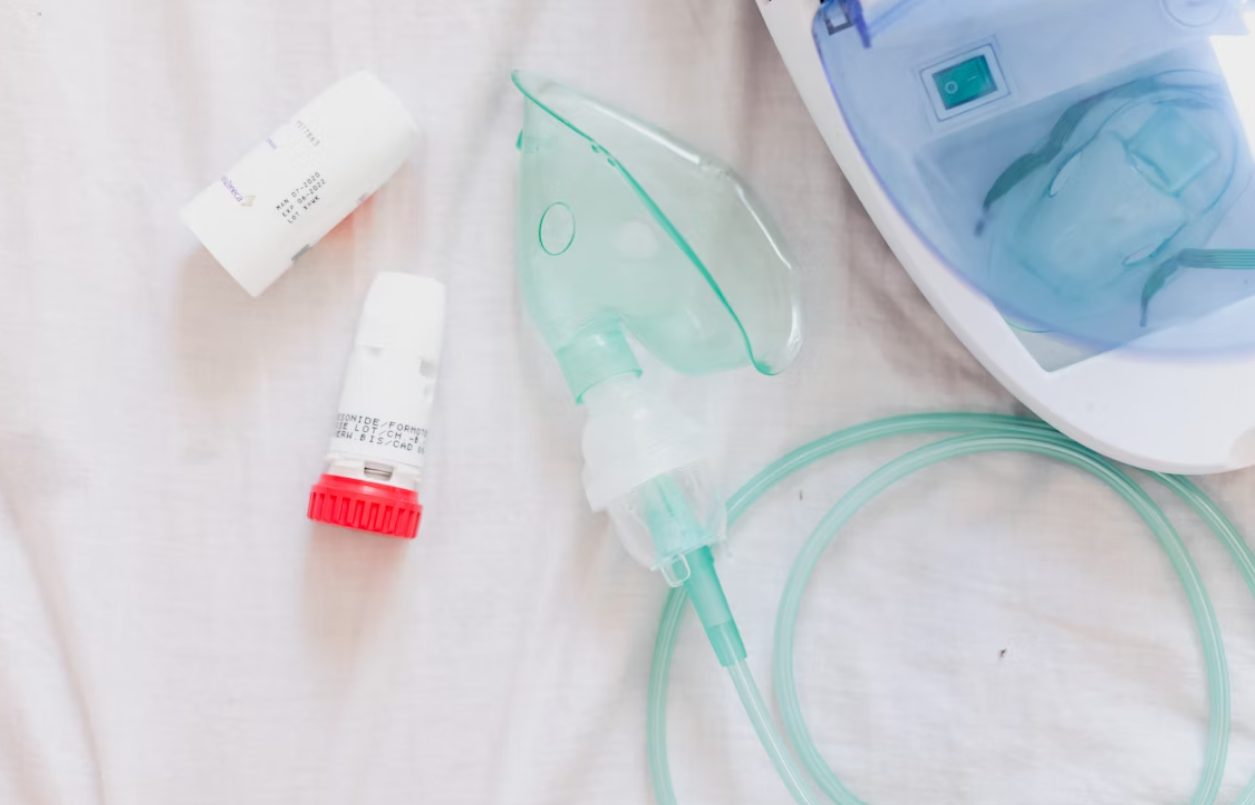
3) Standard Packing List
4) Infection-Control & Cleaning SOP
Keep your nebulizer clean so every treatment is safe and effective. Before you start, wash or sanitize your hands. Check the cup, mask/mouthpiece, and tubing. If a part looks dirty, cracked, or still wet from last time, replace it with a clean, dry one.
After you finish, take the pieces apart. Rinse the parts that touch medicine or your breath with sterile water (or clean drinking water if sterile isn’t available). Shake off extra drops and set the pieces on a clean towel to air-dry. Never seal damp parts in a pouch—trapped moisture lets germs grow.
Do the scheduled “deep clean” your manual recommends. Don’t boil or use harsh chemicals unless your device guide says it’s safe. When everything is fully dry, store the parts and unit-dose vials in a clean pouch. Keep the kit away from heat (parked cars, sunny windows) to protect plastic and meds.
5) Power & Battery Quick Reference
| Item | Recommendation | Notes |
| Voltage | Confirm device accepts 100–240 V | Needed for international trips |
| Plugs | Pack a global adapter set | Match destination sockets |
| Batteries | Carry-on only | Protect terminals; never check loose batteries |
| ≤100 Wh spares | Generally allowed | Keep count and label Wh on each |
| 101–160 Wh spares | Often need airline approval | Many carriers allow max two; verify in advance |
| In-flight power | Choose seats with outlets when possible | Bring a fully charged spare |
6) Digital Touchpoints
7) Rights, Safety, and Policy Basics
Portable nebulizers typically qualify as assistive devices, so they don’t reduce a passenger’s standard carry-on allowance; they still must be stowed safely during taxi, take-off, and landing.
Medically necessary liquids are allowed in reasonable quantities when declared at screening – keep them separate and ready for inspection, and a short clinician note can smooth the process.
Spare lithium-ion batteries travel in carry-on only; ≤100 Wh are usually permitted, while 101–160 Wh spares often require airline approval.
Because policies vary, patients should confirm details with their airline before traveling.
8) Troubleshooting on the Road
9) Where a Portable Mesh Nebulizer Fits
For patients with variable inspiratory flow, difficulty synchronizing inhalers, or frequent travel, a portable mesh nebulizer helps maintain continuity away from home without bulky compressors or wall power.
Pairing the device with unit-dose hypertonic saline solution and a simple cleaning/packing routine preserves dose quality across airports, hotels, and time zones.
10) Patient Microcopy
Traveling with your nebulizer? Pack your device and medicines in your carry-on. Place medically necessary liquids in a separate pouch and tell the officer at screening. Keep spare lithium batteries in your carry-on – if any battery is over 100 Wh, get airline approval first. Do your sessions as prescribed, log them in the app, and follow your cleaning steps. Safe travels!
Can I check my nebulizer?
It’s strongly recommended to keep your nebulizer and medicines in your carry-on. Checked bags can be lost, crushed, or exposed to heat/cold that damages plastics and meds. Carry-on also lets you access treatment if a delay hits. Pack everything in a small hard case, put unit-dose vials in a clear pouch, and keep a short clinician note plus prescriptions. Spare lithium batteries should be in carry-on only with terminals covered.
How do dose times work across time zones?
Let your schedule “slide” to the new local time rather than juggling your home clock. Use itinerary-aware reminders so alerts auto-adjust after landing. If you miss a dose during travel, log it and return to your usual spacing at the next reasonable window – don’t stack extra treatments unless your care plan says so. Before the trip, write down your typical times and the local equivalents to remove guesswork.
Are larger saline vials allowed?
Yes – medically necessary liquids are generally permitted when you declare them at screening. Pack vials in a separate, resealable pouch, keep them in original packaging if possible, and tell the officer you’re carrying medical liquids. A brief clinician note and paper prescriptions help if questions come up. Bring only what you reasonably need for the trip plus a small buffer, and remember policies can vary by country and airline – check before you go.
What’s the best hotel cleaning routine?
After each session, take the nebulizer apart and rinse the parts that touch medicine/your breath with sterile water (or clean bottled water if sterile isn’t available). Shake off excess and air-dry on a clean towel – never seal damp parts in a pouch. Follow your device’s deeper disinfection schedule exactly as the manual describes. Store dry parts and vials in a clean pouch, away from bathrooms’ steam and from heat sources like sunny windows or radiators.


Healthcare is evolving faster than ever, driven by the need for greater efficiency, safety, and precision. At the heart of this transformation is the rise of intelligent sensor technologies. From …
Posted Oct 9, 2025 Health Technology
Connecting innovation decision makers to authoritative information, institutions, people and insights.

Medigy accurately delivers healthcare and technology information, news and insight from around the world.
Medigy surfaces the world's best crowdsourced health tech offerings with social interactions and peer reviews.
© 2026 Netspective Foundation, Inc. All Rights Reserved.
Built on Mar 31, 2026 at 4:17am